The Yurt Cooler is a highly optimized evaporative cooler (also known as a swamp cooler) designed for off-grid use at Burning Man and other dry climates. You can build it with 2-3 hours of labor and about $130 in materials, in addition to a 12V deep-cycle battery (around $60-$100 if you don't have one already).
The Yurt Cooler is the final result of rigorous testing and optimization by two electrical engineers. You can read about our tests here. It provides about 10x the heat-removal rate of the popular "bucket and computer fan" swamp cooler design. In tests at Burning Man in 2015, the Yurt Cooler cooled hexayurts to 13°F below the outside shade temperature, at high noon. (Without a swamp cooler, a yurt is at least 10°F above outside temperature at high noon.)
It consumes roughly 1 gallon of water every 2 hours. (Because of the water consumption, it's intended to be used just a few hours per day. We recommend using it to sleep late in the morning!)
| Deep-cycle 12V battery | Any 12V deep-cycle battery will work fine. You can often get better deals at a local supplier. To estimate how many hours your Yurt Cooler will operate before the battery is dead, just take (battery amp-hour rating) / 2.5. For example, we're using an 85 amp-hour battery from Peninsula Battery in San Francisco, so it gives about 34 hours of operation between charges. Any 12V battery charger can be used to recharge your battery when you get back to civilization. Note: a normal car battery could power the Yurt Cooler, but deep discharge cycles will severely shorten a car battery's lifetime. This is why we recommend a deep-cycle battery rather than a car battery. Deep-cycle batteries are sometimes called "marine batteries" because they're used to power trolling motors on boats. |
| Plastic storage box with airtight lid | We tested on the "Really Useful Boxes 21L Box" at that link, purchased from Orchard Supply Hardware, and we highly recommend it -- it forms a perfect seal around the humidifier filters. Also, its straight sides are good for mounting the ventilation blower. If you can't get that model, you can use a different storage box with an airtight (or nearly airtight) lid. The inner dimensions should be: 6.5-7.5" tall, 10-14" wide, and at least 12" long. Some possible substitutes: |
The rest of the parts are all available on Amazon.
Items marked with a (*) can be shared among 2 or more people.
| Furnace inlet filters* | You only need 1 per Yurt Cooler, so this is a good item to share with friends. |
| 4" Boat ventilation blower | Do NOT try to substitute a computer fan; the Yurt Cooler requires the power of a ventilation blower. |
| Two large humidifier filters | Order 2 of this Amazon item. These wick the water up, so it can be evaporated. |
| Stainless steel wire* | Any stiff, non-corroding wire will work |
| Switch (or 10-pack*) | Any single-pole switch rated for at least 3 amps will work (i.e. any typical household light switch). |
| 3-pack of ring terminals or 10-pack of ring terminals* or 100-pack of ring terminals* | This connects your wires to your battery. Standard deep-cycle batteries have a 5/16" screw connector, so we recommend a ring terminal sized to fit a 5/16" screw and 14 to 16AWG wire. Any of the Amazon items to the left should work. You'll need 2 ring terminals per Yurt Cooler |
| 16 or 18 gauge electrical wire | We recommend red and black 16 AWG wire with silicone insulation, because it's very durable. |
| 5 amp circuit breaker or this one | |
| Electrical tape* | |
| Foil tape* | Also available in the ventilation section at home improvement stores |
| Optional, not recommended: 12V thermostat | Buy this if you want your Yurt Cooler to turn itself on and off like a home air conditioning system. We found this to be a little unnecessary, so we don't recommend it for Burning Man, but the option exists. The thermostat comes with instructions to hook it up, so we don't cover it on this page. |
| Recommended: cigarette lighter socket | Add this if you want to charge your cell phone by plugging its car charger in to your battery (this has nothing to do with the Yurt Cooler, but it's quite nice to have. We recommend it.) To hook it up, you just connect its red line to your battery's "+" and its black line to your battery's "-". |
| Optional: ear plugs | For sleeping next to the Yurt Cooler while it's running, and sleeping at Burning Man in general. (I find the white noise from the fan quite tolerable, so I rarely use these, but ear plugs will add to your comfort.) |
| Ability to solder | You'll probably want the ability to solder wires together. If you're not set up to do this, consult a friend. There are also many good online tutorials. For this project, you could make connections by just twisting wires together and wrapping them tightly in electrical tape. Soldering is much more reliable though. And it's fun. |
| Ability to cut and drill holes in plastic | A Dremel tool is perfect for this. Borrow one from a friend if you don't have one. Use the cutting attachment to cut the rough hole shape, and the sanding attachment to smooth it out. |
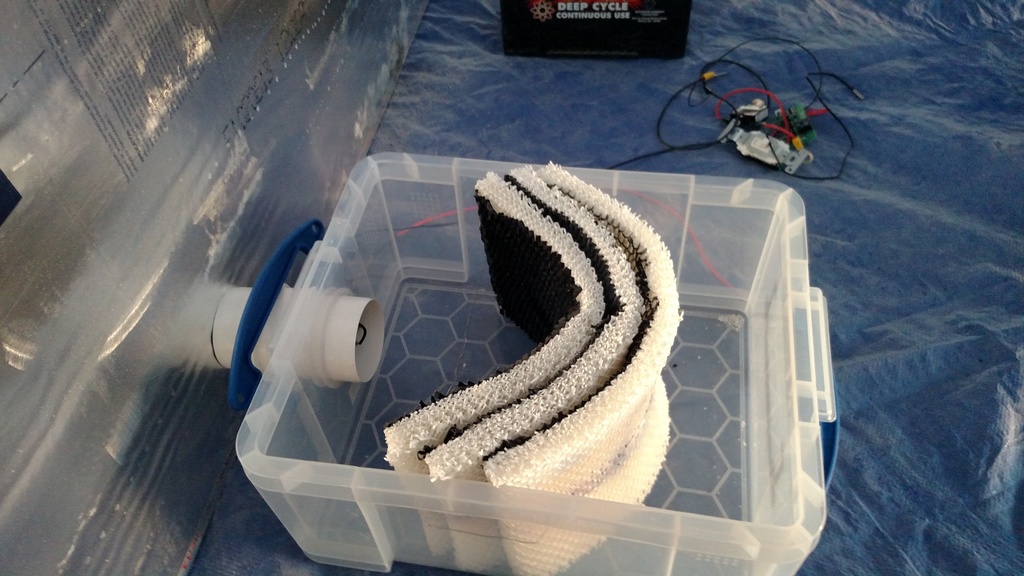
1. Cut a hole in a short side of the box, to fit the boat ventilation blower:
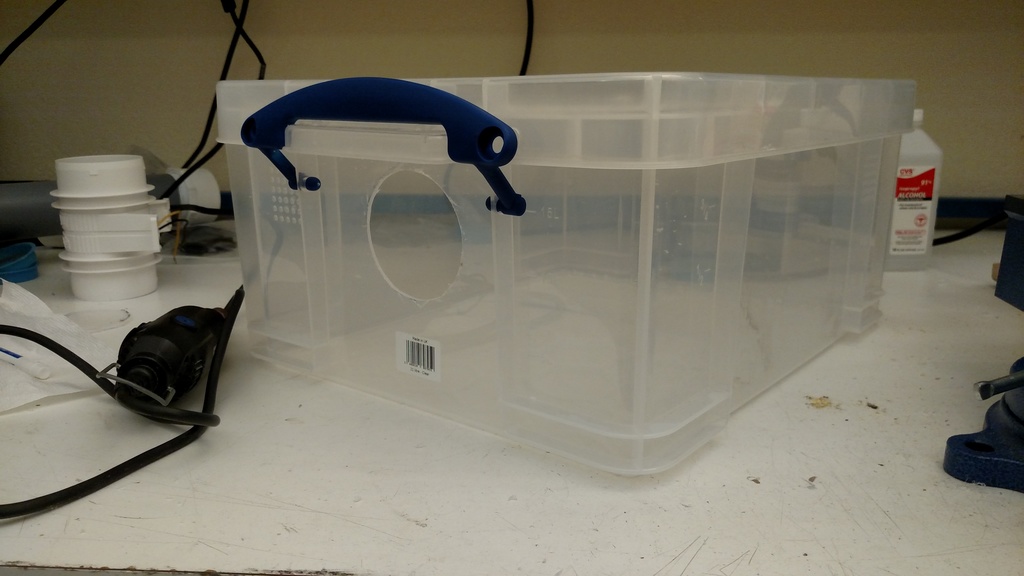
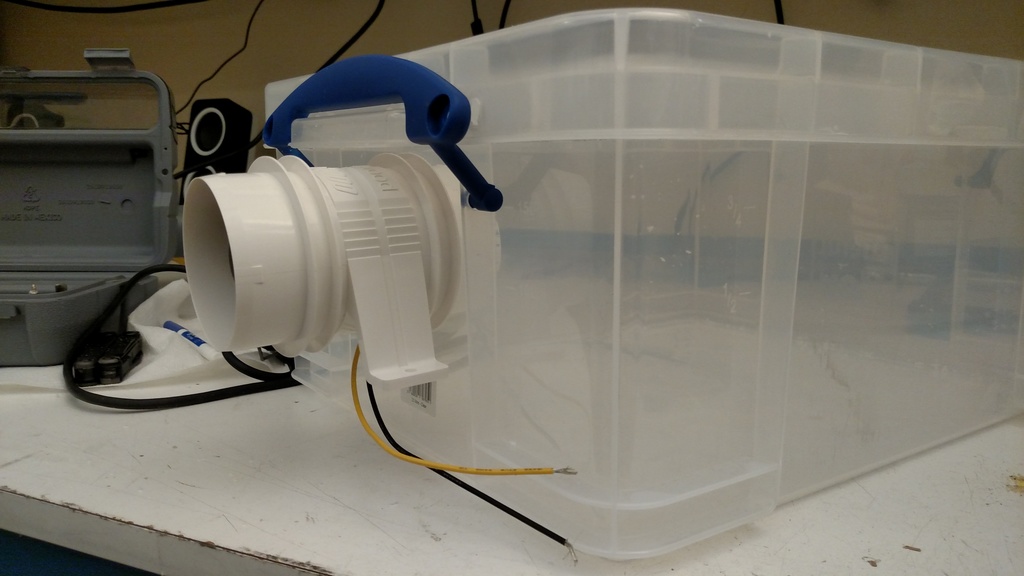
Cut it as high as possible, but ensure the blower won't stop the container lid from closing. (The hole must be high to leave room for water in the container.) Try to size the hole precisely, so the blower is held in the hole by friction. (But if it's too loose, you can use tape later.) The side with the hole is now the inlet side. The inlet side is on the left in all the pictures below. The other side is the outlet side.
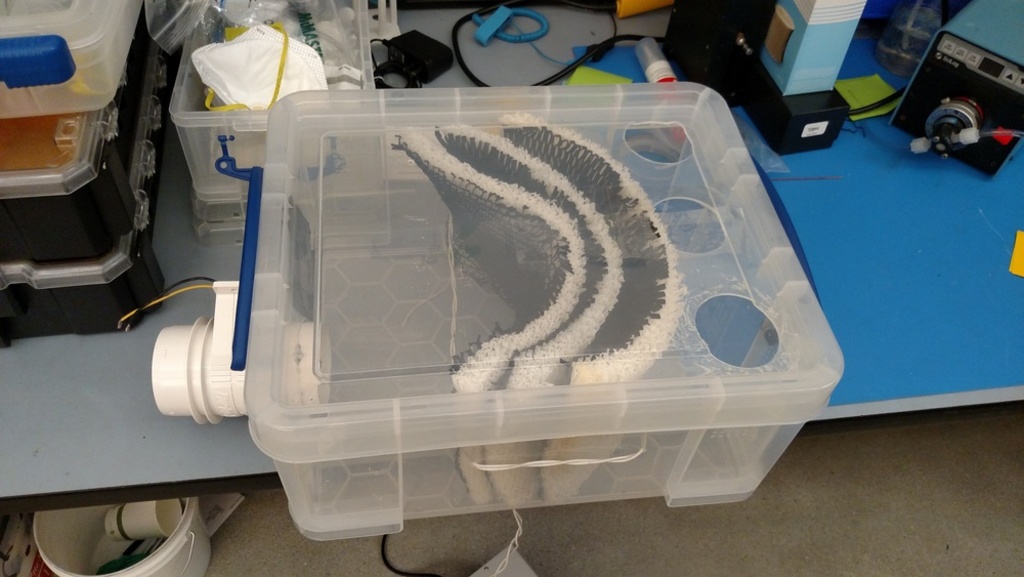
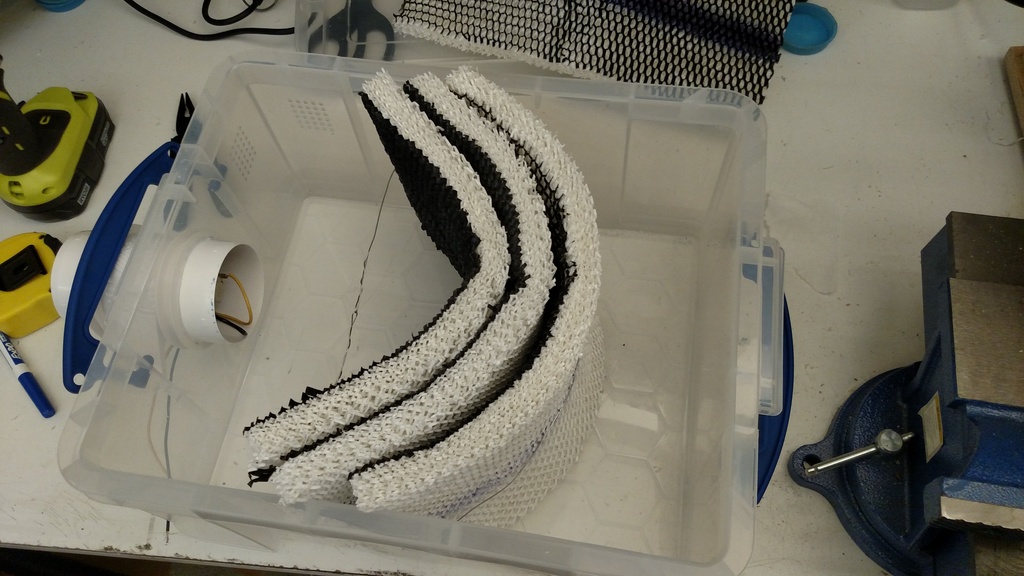
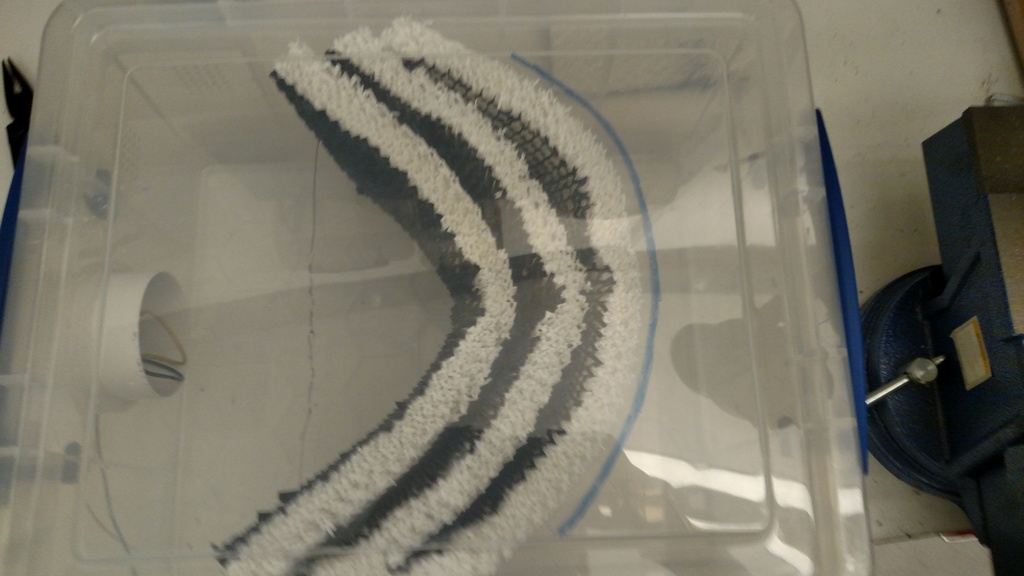
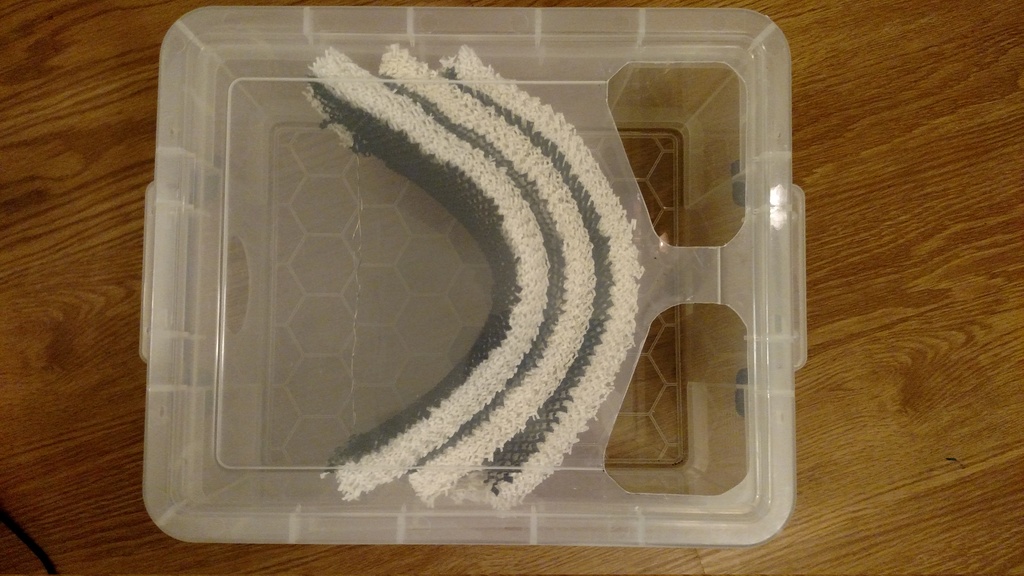
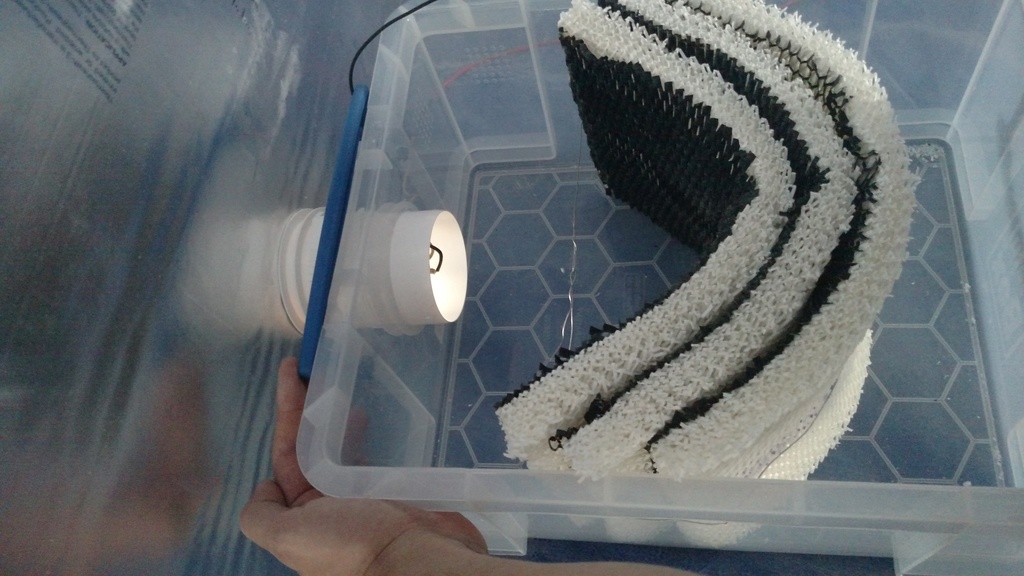
2. Cut your humidifier filter so it fits into your container as shown.
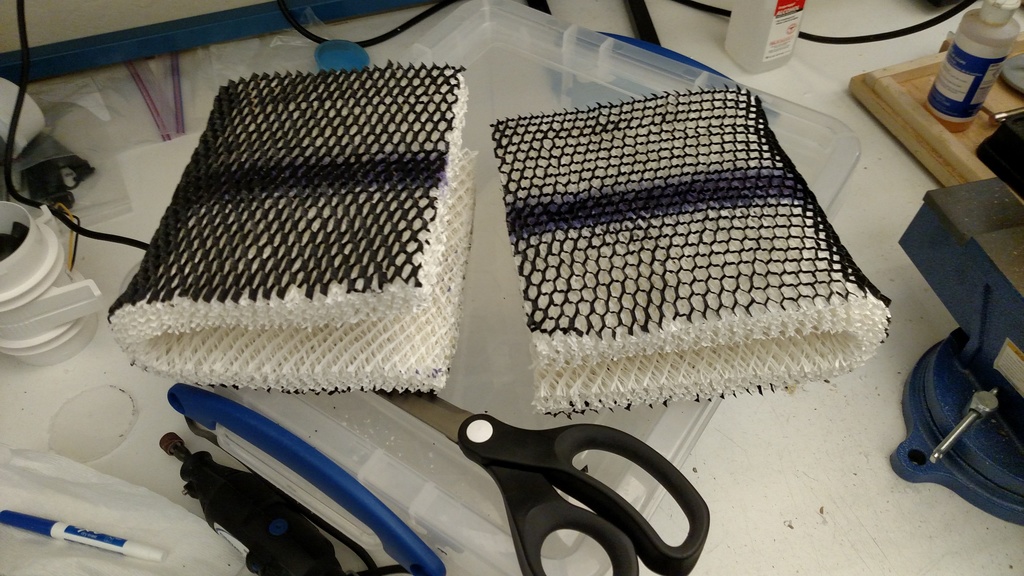
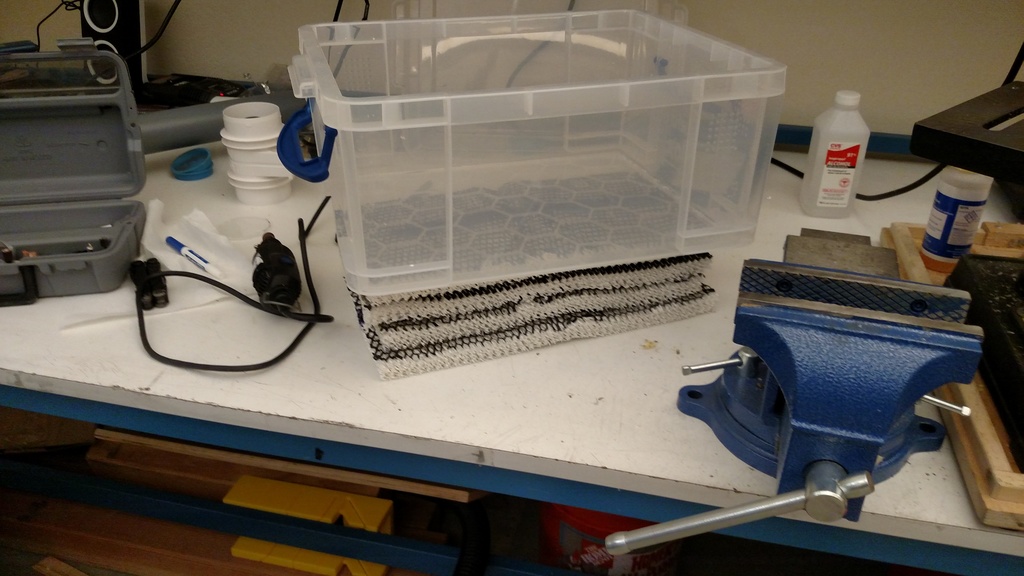
If you bought the storage box and filter listed above, the height will be perfect with no trimming required. The length will be perfect if you cut each round filter into 2 equal parts.
Otherwise: cut the filter with enough extra length to form a "U" shape in the box, as shown. (This maximizes surface area, and promotes a good seal on the edges.) Cut the filter with enough height so it gets pressed against the top and forms a nice seal when you close the lid. (Air needs to go through the filter, not around it.)
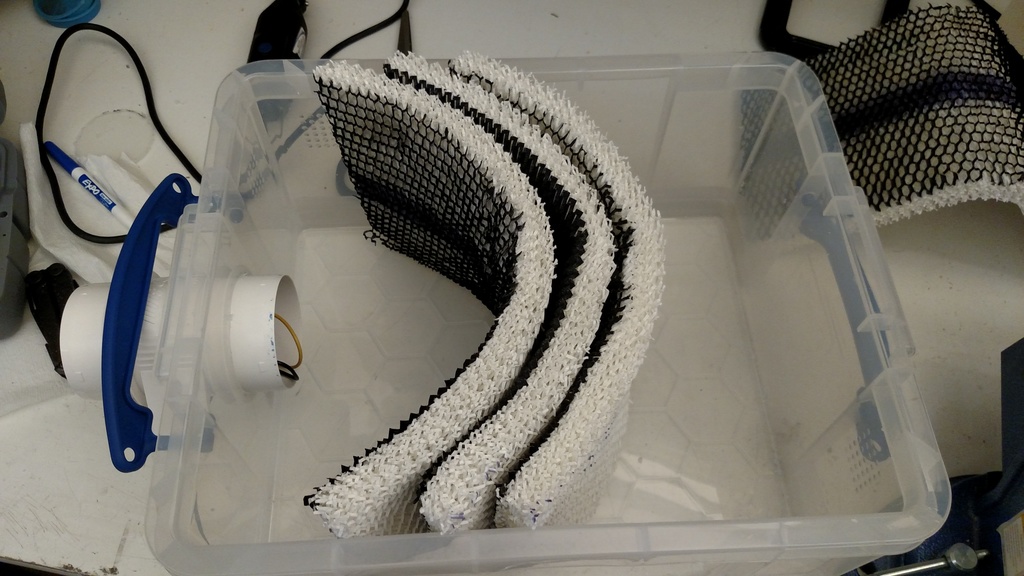
You will need 3 layers of filter material, one after the other as shown.
3. Run support wire to hold the filters in place
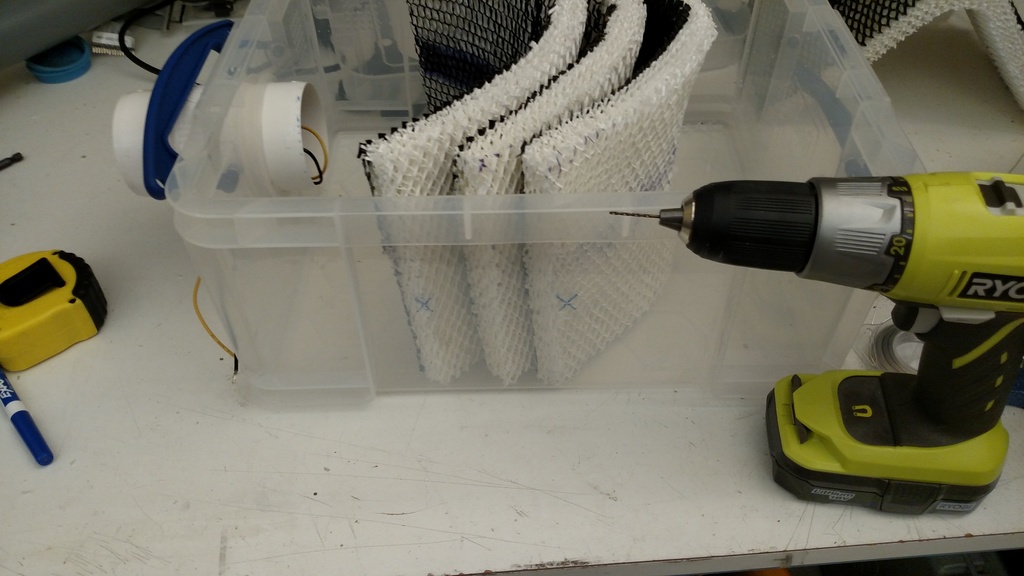
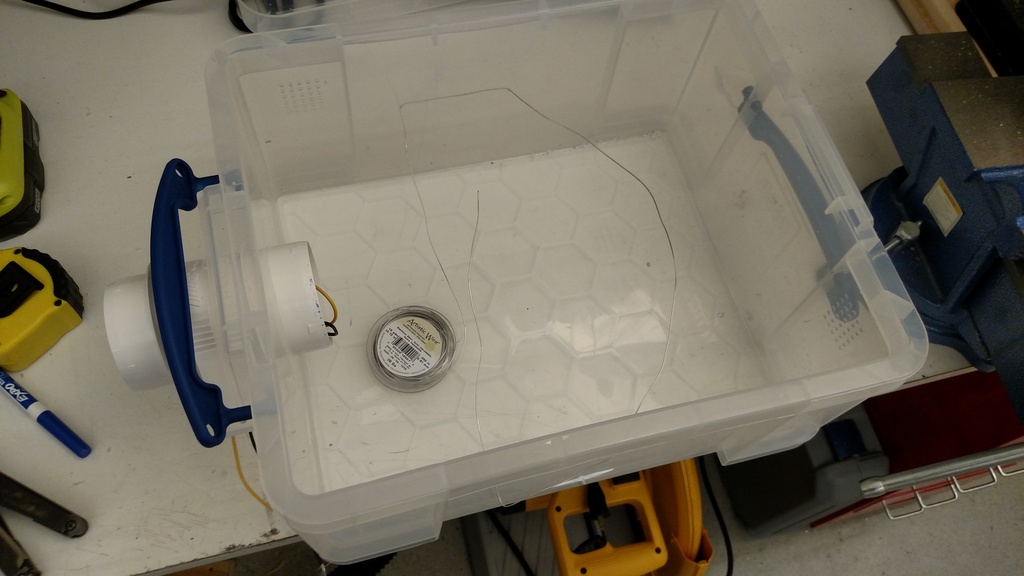
In each long side of the container, drill two holes approximately 7" and 10.5" from the outlet side. The holes should be just big enough to fit the stainless steel wire.
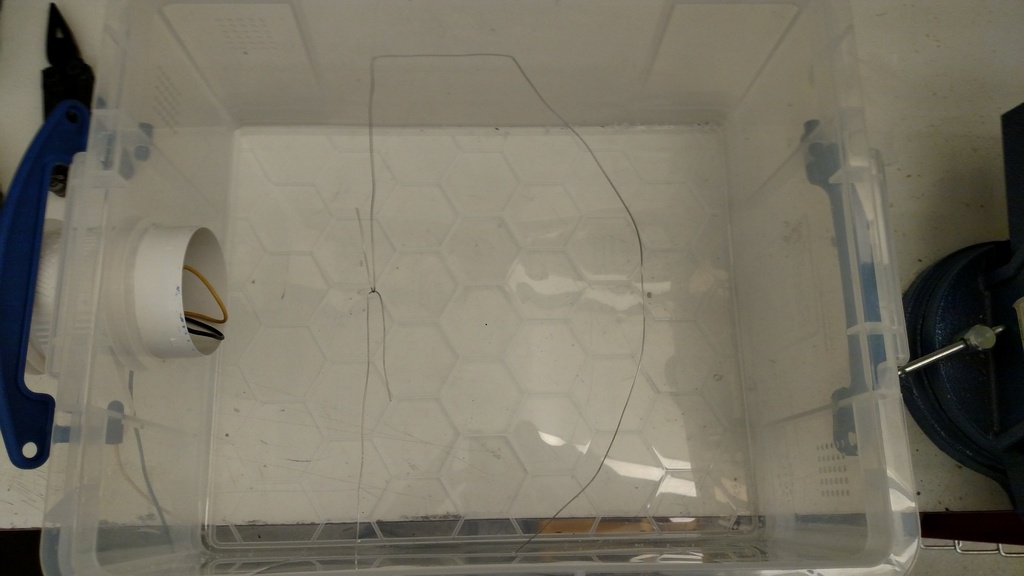
Loop the stainless steel wire through the holes so it supports the filter in its "U" shape.
Overall, the wire should form a "D" shape as shown, with the curve on the outlet side. When you're done, you should be able to put the filters inside the wire as shown. It should be a pretty tight fit. The filters need to be pressed against the walls of the box, so that airflow can't bypass the filters.
4. Make outlet holes in the lid
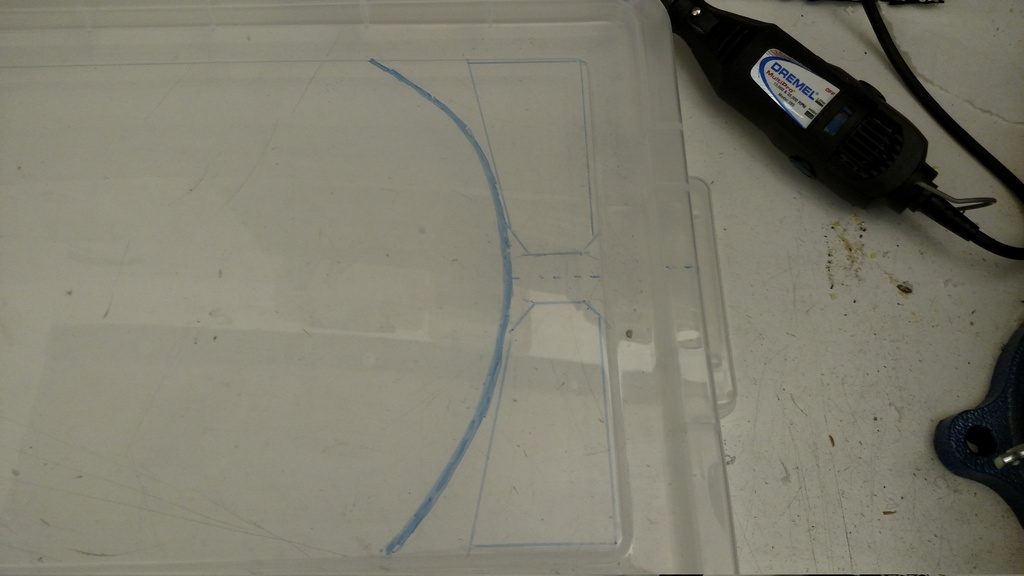
On the outlet side of the humidifier filters, cut openings for air to escape. The hole design in the pictures is a good choice.
Or, if you want to get artistic with your holes, here are the guidelines:
5. Make electrical connections.
Use the electrical wire to make the following connections, as shown below.
With red wire:Note on connecting the switch: some switches have 3 screw terminals, where two are gold-colored and the third is green. Use the gold-colored ones.
For the circuit breaker and switch, the order of the terminals doesn't matter.
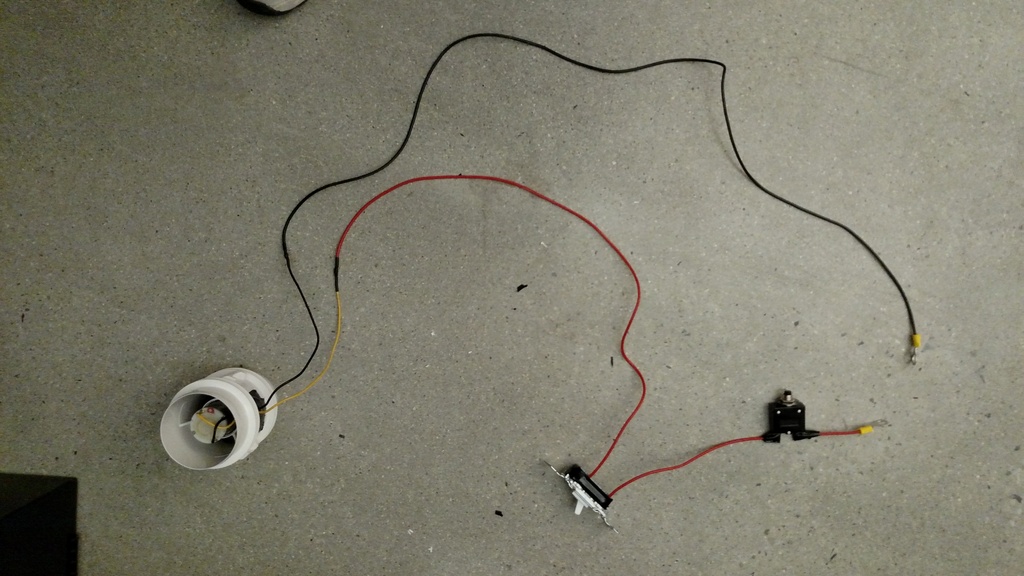
As noted above, use 16" or more of wire to connect to the blower. With a shorter wire, it will be hard to reach the on/off switch when the blower is installed. There's no hard upper limit on wire length, but the fan will start to have less power if your wires are longer than 10 feet or so.
For the connections at the breaker and blower, use solder if you can. If you can't solder, you can twist them together with pliers.
Wrap all connections with electrical tape to prevent accidental short circuits. There should be no exposed metal at the connections.
Electrical Safety Note: The 12 volts used in this project is not enough to electrocute you. But there is risk of an electrical fire if you accidentally make unintended electrical connections. So, please double-check that no metal is exposed at the electrical connections. Basically, if you accidentally connect the red and black battery terminals directly to each other, without the blower in between, the resulting high current will cause extreme heating and probably an electrical fire. The circuit breaker is supposed to disconnect the battery if that happens, but we shouldn't rely on it.
6. Connect battery and test the blower
Safety Note: The blower will turn on during this step. It's powerful, and its fan blades are sharp. Keep fingers and small objects away from it.
Attach the blower in the inlet of the storage box, if you haven't already. This will hold it in place during the test.
Connect the black ring terminal to the "-" side of the battery. Connect the red ring terminal to the "+" side of the battery. If any of your components get hot, immediately disconnect the battery. (Depending on the initial switch position, the blower might turn on when you connect the battery. That's fine.)
Test that you can turn the blower on and off using the switch. If it works, your Yurt Cooler is complete! If not, double-check your electrical connections.
Draw an arrow on the blower with a permanent marker to indicate air flow direction. (When you install the blower later, you'll want to make sure it's pushing air into the Yurt Cooler, rather than sucking air out.)
Disconnect the ring terminals from the battery. Before transporting the battery, cover the battery's terminals with electrical tape (or duct tape), so that no metal is exposed on the battery. This is important because, if a metal object accidentally fell on the battery and connected the "+" terminal to the "-" terminal, the resulting high current would cause a fire.
1. Cut inlet hole in your yurt.
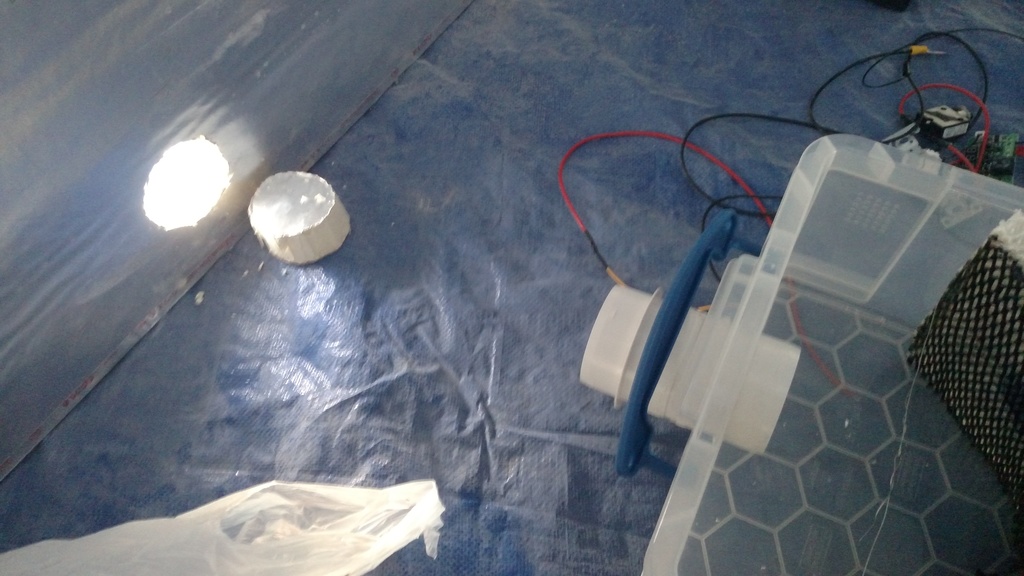
Push the Yurt Cooler against the inside wall of your yurt, at the point farthest from the yurt door. Air will flow across your yurt interior and out at your door.
Cut a round hole in the wall to fit the inlet of the blower. Make sure the cooler isn't sitting in a depression or a hill. You don't want the hole to be the wrong height next year.
Double-check that the blower's direction-of-air-flow arrow, which you drew earlier, is pointing into the cooler. Push the blower into the hole. If there are gaps, use foil tape to seal them.
Attach dust filter
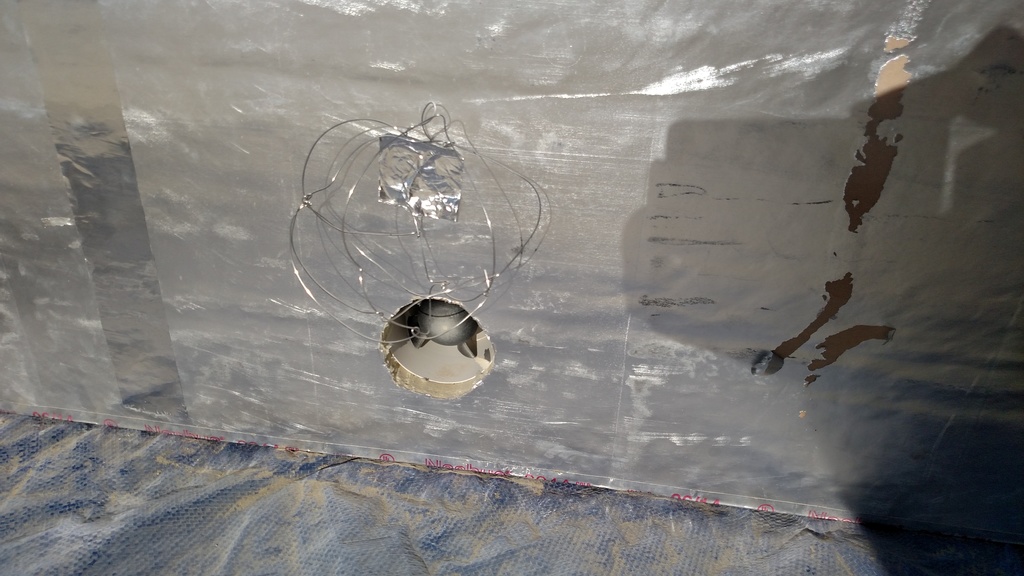
Safety note: Make sure the blower is OFF when you do this! Operating the blower without the dust filter installed is very dangerous! Small objects or fingers can get sucked into the blower, ruining the blower and your day!
Use the stainless steel wire to make a ball, about 4" in diameter, and tape it to the outside of your yurt, just above the blower inlet. This ball will hold the dust filter away from the blower inlet, ensuring that the blower pulls air from the entire area of the filter. Without it, the filter would get sucked up against the blower inlet, drastically reducing airflow and cooling power.
Note, this step is vital for efficient Yurt Cooler operation. In a pinch, you can also substitute a water bottle or another object about that size.
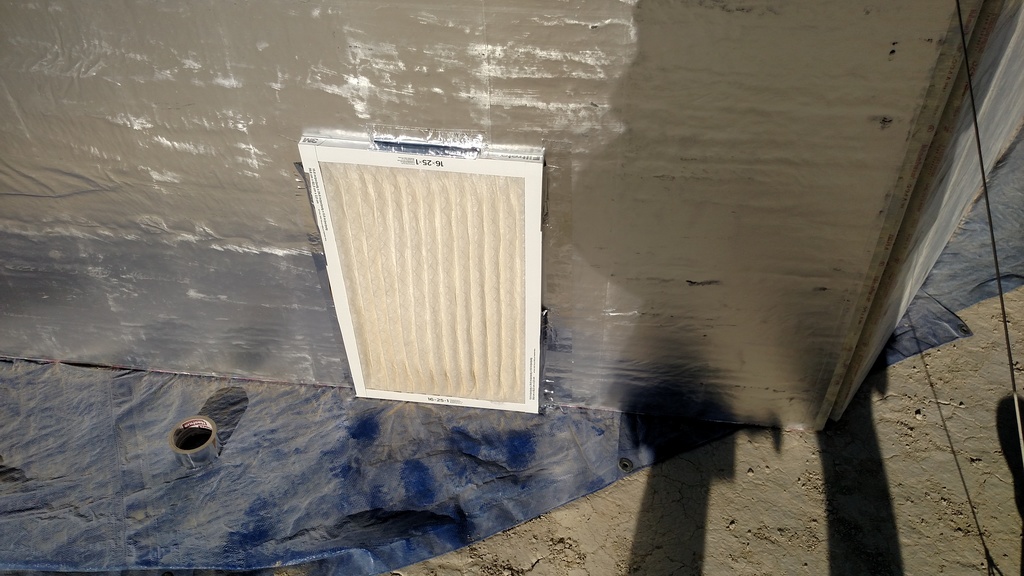

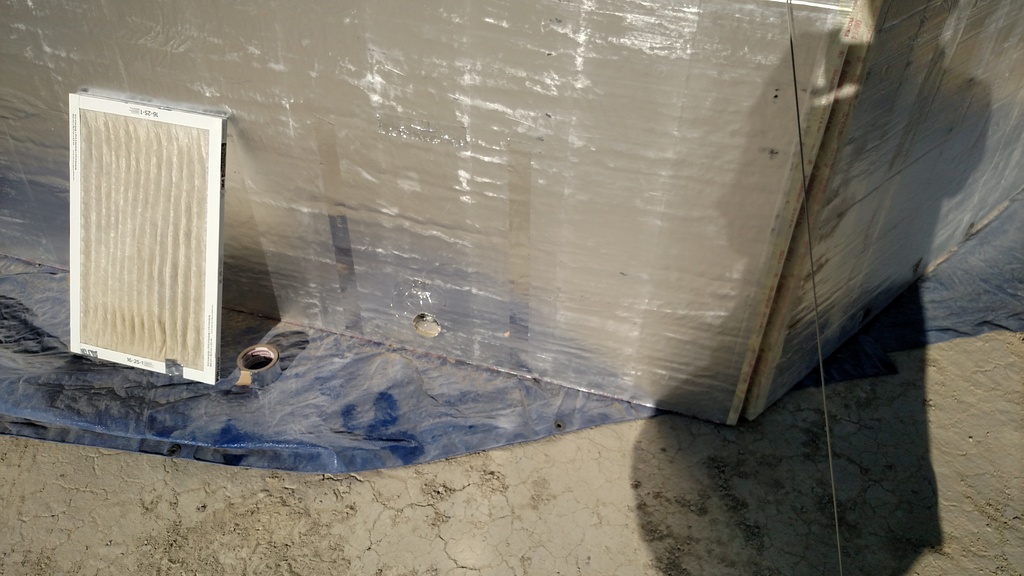
Use foil tape to tape the furnace inlet filter to the outside of your yurt, covering the blower inlet. Make sure the wire ball is making the filter bulge out, as in the pictures. Use enough tape to ensure the filter won't blow away in the wind!
Tip: before you tape something to a yurt wall, first put down a flat layer of foil tape. That will permanently reinforce the flimsy wall-covering material. Now, you can stick and peel off other tape, on top of that layer, and you won't rip off the wall-covering material.
Once the dust filter is solidly taped in place, connect your Yurt Cooler to your battery (red wire to "+", black wire to "-". Turn it on, and verify that a strong airflow is coming out of the cooler.

Pour water (a gallon or two) into the Yurt Cooler and turn on the switch. In a few minutes the humidifier filters will wick up the water, and cold air will come out. You'll get about 2 hours of cold air per gallon of water.
Tip: Put your bed near the Yurt Cooler, so the cold air hits you before it gets warmed up by the yurt walls. If you want to get fancy, you can even make flaps out of tape or cardboard to direct the cold air at you. (Just make sure you don't restrict the airflow. Any restriction on airflow will drastically reduce the cooling power of the Yurt Cooler.)
You can also run it without water to ventilate your yurt.
To make it quieter, you can pile clothes around the blower (in the gap between your yurt wall and the Yurt Cooler) and around the Yurt Cooler itself.
If it loses airflow and cooling power, check if the dust filter is clogged with dust. Brush it off if necessary.
Enjoy your scientifically cooled yurt!
Send questions or suggestions to 